Sunday, February 28, 2010

New Visitor Counter added!

Hey all, found a great site of widgets to add to blogs and web pages etc. Have added the new visitor counter on the bottom of this page from there. (If you want one you can click on the counter).

It doesn't register page hits, but rather individual visitors and where they are from, if you click in the counter it changes to a global map of who's looked from where, how long each place has been on for and where is online right now. I really love the interface and it's so interesting to see where everyone reading is from.

Reminds me that a blog is truly global publishing. :)

I've had over 550 page hits in the last week, which is really encouraging. If there is something you'd like to see on the blog that isn't, or more of a particular type of post would really love to hear from you! (please comment if you have any suggestions).

Some ideas would be patterns (free or otherwise), tutorials (if there's something in particular let me know), lists of tips, design or colour information, works in progress, interviews with quilters (which I hope to start soon), competitions, paintings and other artwork for sale, fabrics etc etc.

Saturday, February 27, 2010

How my dog has been choosing to use her 'pooch pads'.


Yep, they're meant to be for peeing on. Sigh. She's recently taken to napping on them, which wouldn't be so bad when they are clean if the carpet under my sewing desk hadn't been newly christened - and if you've ever tried cleaning carpet under an immovable object... it's not easy!

Lucky she's cute! (and it's not like she doesn't have a plethora of beds all over the place!)

Normally the pooch pads work really well. We're in an apartment and have no back yard, even though the park is over the road it's a good thing to have a back up for overnight or when no-ones home.

To make the pooch pad I measured up some incontinent bed pads for elderly people (you can buy them in bulk and they are cheaper and larger then ones you buy for puppy training). I then went to an art supply store and got a wooden slats (usually for stretching canvas on) that would make a frame just big enough to fit the pooch pads with a little overlap in the middle. I stretched some printed thick plastic (available on the roll at Bunnings or Spotlight) as if I was doing a canvas and staple gunned it to the frame back, ensuring it was loose enough that when I flipped it right side up I could push the plastic down into the frame. This gives a flat surface for the pads. Because I sized it so they extend up onto the wooden sides of the frame if she does pee right on the edge it runs back down onto the pad and not the carpet. 

Just wish I'd thought of it about two years earlier!!

Quilt Binding, Edging and other finishes


When I work on a quilt one of the things I sometimes think of right at the start is how I'm going to want to finish it's edges.

I'm not a big 'functional sewing' fan - I'm the opposite of most people I know in that the artistic side seems to come easily, but give me a hem to take up and there's often serious unpicking. I am getting better, i've probably even managed a couple of shift type dresses without too many nasty swear words, but it's something I need to concentrate on to do - and even then cross my fingers and hope.

The same goes for traditional patchworking, which I'll admit to not having tried much of - matching points and inset seams (which still irk me so badly I don't design with them) just seem to be more luck then skill if they do work.

For this reason - and because I don't hand sew much at all (unless I want blood stains on my quilt :) !) while I am always after the edge treatment that suits my quilt the best, I'm also after the absolute easiest way to do it.


 Binding: 

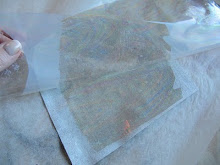
For traditional bindings I always go back to this 3 part Sharon Schamber tutorial on You Tube. She uses a wash out craft glue (No pins! My third sewing nemesis after hand sewing and unpicking!!) to position and fit the binding - and check for mistakes before you sew. This method takes a little time (but less then hand sewing or unpicking!) but gives a wonderful tight, neat binding, even for functional sewing misfits like myself. :) Best of all the glue washes out completely!

For Sharon's wash out glued binding tutorial click here!

For the glue there is a wash out one available at Spotlight if you don't want to try and find the Elmers.


 Facings: 

For Facings I always go and revisit this tutorial page on Brenda Gael Smith's blog. I love how it links to a whole number of different facing finishes, showing how to do each one. There is also a pic showing 4 different ways to clip a corner and how each finishes up, that means I get to pick the one that suits my quilt the best without having to trial for myself :)


There are so many other ways to finish the edges of a quilt though. 


 Selvedges / Transparent fabrics: 

This small quilt below (click on it for a bigger pic) submitted for a Self Portrait challenge had the selvedge edges (complete with fringing) cut from organza with a soldering iron (so there was no fraying). I just used a metal ruler on my glass hot plates to position the fabric, held with a ruler and then drew a line down the edge with the soldering iron to cut and seal it in one go. 

I then folded one of these over the top, another on each side and one on the bottom. To help manage translucent fabrics you can fuse them down with misty fuse (a see through fusible web) or do what I did hear and use wash out glue. A quick dunk in a water when finished washes it straight out and there's no slipping to worry about when you sew.

You could use conventional cotton selvedges cut with scissors or rotary cutter- with the branding etc printed on them and just hem the side that will go on the back and fold the selvedge to the front.

You could also use felt, vinyl or other non fray fabric.


 Melting the edge: 

For synthetic fabrics only - the quilt below was made with acrylic felt and lots of speciality synthetic fabrics (organza / satin / tulle etc). For it's edge I used the soldering iron to very slowly trace around the edge sinking it into the quilt a little more here and there to give an uneven edge. I had to wipe the soldering iron off frequently on a metal wool ball (which i purchased in a stand together with the soldering iron itself).


I used this same technique on the leaf quilt below. This one is backed on vinyl and I left some of the organza and tyvek leaves (also cut with a soldering iron) to over hang the edge.

You can use this technique for silk, you just have to work much slower and I'm not sure how it would work on battings etc. For silk it burns a fine edge as opposed to melting it.


 Stitching: 

You can use conventional close up zig zag stitch but if your machine does decorative stitches try out some of those and adjust the spacing closer together. The quilt edge below was done using the one sided grass stitch on my Pfaff. I upped the length to it's longest setting the made the width the smallest. (9mm and .2 respectively). Remember you can really change the look of a stitch by playing with it's length and width settings.

The red quilt is with grass stitch and the second has a metallic satin stitch.


 Couch a decorative edge: 

For this just do a basic zig zag (or small satin stitch if you like) all around the edge in a colour to match or contrast with your trim, then use your couching foot to apply a ribbon, brocade, yarn or even cut fabric strips to the quilt edge. I don't have a quilt to show you this one from myself though I know i've done it in the past - but the best example i've seen lately is in this really amazing quilt Judy Coates Perez created and uploaded to her blog. Her work is just wonderful.


 Remember your decorative presser feet: 

Along with couching over the top of zig zag you may want to try out any decorative feet you have for your machine. For the pfaff I have a fringing foot, a cording foot (which allows me to thread up to 9 decroative threads through holes and then to a fancy stitch over the top of them) and may others.

Here's a short video that shows the 9 hole cording foot from Pfaff. I think it looks great with a metalic thread in a decorative stitch on top.

Lastly:

 Freemotion the edge: 

Treat your edge like an extension of your quilt. For this small thread painted and fused collage piece I did a freemotion zig zag (but it could have been a straight or decorative stitch) over the edges and drew back into the quilt. I matched the thread to what I was working on - so oranges for the sky etc.


Basically as long as the edges are sealed you're good to go! If fraying is something you want - and you don't mind your batting showing (i think this would be a good look if you dyed your cotton batting to a colour that matches or contrasts your quilt) just do a line or two of straight stitch or freemotion around the edge. The purpose of a binding to to secure the quilt layers and stop them coming apart - so as long as you're pleased with the finished look and it's structurally sound it really doesn't matter what type of edging you use.

Share

Saturday, February 20, 2010

Friday Night Sew-In

Well I spent most of the sew-in evening on the web trying to find out what sort of alternative edge treatment would suit the quilt i've been working on. I can't decide between facing and satin stitching, and I'm absolutely horrible at hand stitching (and really don't enjoy doing it - that's the understatement of the year!) and most facings require hand stitching to secure them.

I went and looked at my favorite blog for facing information by Brenda Gael Smith:

http://serendipitypatchwork.com.au/blog/2009/01/13/my-favourite-quilt-facing-finish/

and decided it was a tie between doing a pillowcase finish and a grass stitch satin stitch around the edges in a matching thread to the fabric underneath it. (Grass stitch is an uneven zig zag like a heart monitor line or grass profile on one side and flat on the other so you can use it to sew around the edge of quilts like a normal zig zag satin stitch).

So I cut a facing and picked out threads and finished off the shiva sticked gingko leaves.

So not very productive though I did get a refresher in the different type of finishings available and what they all look like.

Here's a pic of the shiva sticked part of the quilt. I'm not sure if I'll exhibit this one yet so can't show the whole thing.

Studio Clean Up

Part of my getting back into creating this week was a huge sewing studio clean up. I only have a smallish second bedroom for a studio and the work surface had become hard to find. Fitting in the new silks (previous blog) was going to be impossible in my overfilled bookcases. Because space is at a premium keeping it organised is a must.

I had purchased three 6' tall pine bookcases to house my stash, but was worried about all the natural fibre fabrics in the first one fading. I'd made block out curtains to for both windows in the room to reduce both light and heat, but needed something more for when I was working during the day. I put up a sheet of plain 100% UV block out curtain lining (plastic side out) as a book case curtain to prevent fading and drew a design with black pigment texta (waterproof) to dress it up a bit.

So here's some pics of what my sewing studio looks like now. There's still a few things that can be finessed but I'm really happy I managed to fit everything into the first bookcase and I like the curtain. It's easy enough to push out of the way for when I want to pick fabrics while keeping light away from them the rest of the time.

1. The  first bookcase. Everything that didn't take up the full shelf width was refolded giving me extra height to put the new fabrics in. Dress making fabrics are in the white baskets, silks on the 2nd draw and cottons from there up. Fat quarters that won't fit with the rest and novelty fabrics are all on the top shelf and boxed so I can easily take them down when I'm after that sort of thing. The second photo shows the curtain I put in front to prevent fading with the pigma pen design drawn on.


2. The second bookcase holds all my synthetic fabrics and rolls of stabilisers along with some boxed UFO's. All my smaller threads are sorted by type in plastic containers on the 2nd top shelf (cottons in one, rayons in another etc). I have other plastic containers for things like Textiva films and Angelina fibres which makes it really easy to get things out as I need them.

The third bookcase holds my Babylock overlocker (no tension settings, sigh!) and embellisher. One large pink box has snap lock bags filled with scraps. I've sorted them by colour so if I'm doing something like fused applique I can quickly grab whichever colour I'm after and sort through until I find the perfect fabric.

I labelled cardboard boxes from the $2 shop for things like ribbons, heat tools, rovings, buttons etc.


3. My sewing areas. I saved up for an all in one LCD TV as I was putting off sewing when there was a good movie or whatever on... and I tend to get bored with no other stimuli. This seemed like a great idea but the DVD player inside it recently broke and it only had a SD tuner....so now I have those things separate next to it. Still for all the times I don't put off sewing now it's worth it :)

My desk is a Horn 'magic box' - it's 2m wide and long in a T shape, but the sides fold up and the machine pushes down before the whole thing rolls into the box with the TV on top. This means I get to maintain a spare room (well kinda) for when people stay, by putting an air bed in there. One of my sew easy tables fits nicely into the gap of the T which is really handy for taking the weight of larger quilts. One of my friends made an acrylic template that covers the entire hole in the top so it makes a good work surface for painting or drawing when it hasn't got one of the other machines in it.

There's a second sew easy table against the window on the left but the machine for that one tends to live underneath most of the time. the stack of things on top are all things that need to be finished soon. When I'm working on a very large quilt I move this one out and put it to my left - so it carries the weight of the quilt before it hits the sewing desk.


4. My design wall is just a large piece of flannelette that I cut some holes in the top and put over picture hooks. It has the strips from a much earlier blog on it as I still haven't worked out what to do with them! I supplement the rooms lighting (which is pretty average since there's only one downlight for the whole room!) with the floor lamp - it was a whole $30 from Bunnings, takes a 100w globe and makes a huge difference.


On the other side of the sewing machine is a built in robe with all my waddings and a chest of drawers with various stabilisers / web etc. However you really don't want to see that as is subscribes at least a little to the 'push and close before anything falls out' school of organisation :)

I still do all my wet work (painting mostly) in the lounge area where I have easels set up and store all art equipment including fabric paints. For painting fabric I use a piece of colourbond steel as an easel. You can see my old set up which includes this easel in an old blog post on my website here: http://web.me.com/eiloren/eiloren/blog/Entries/2007/10/28_My_sewing_area.html

Hope this gave you some ideas of what's possible in a quite small room.

Thursday, February 18, 2010

Tutorial - Foiling Fabric

I needed to create a moon for an art quilt I'm currently working on. I wanted something that really glimmered and shone but still had some texture. After toying a few different ideas (lumiere paint, tyvek, lutrador, angelina layers, textiva, glass organza, rainbow shimmer chiffon etc etc) I decided to use some silver glitter white cotton layered with some jones tones foil.

The foil is washable and can be put down in a few ways. I used heat and bond fusible web to get a flat even coverage.

Here's how:

1. You will need: Non stick baking paper, backing fabric, jones tones foil (from spotlight or speciality art / craft / textile stores), fusible web, scissors and an iron.


2. Layer your backing fabric (right side up), and fusible web (paper side up) between baking paper. Iron to fuse the web to the fabric. Use the dry setting on your iron.

I used a heavier weight fusible web as I didn't want any areas without foil. A lighter weight like misty fuse or vliesofix will only have the foil adhere to the lines of web. This can give a nice effect but wasn't what I wanted for this.


3. When cool peel off the backing paper. This will have given the fabric a very shiny laminated type effect that can be useful in itself. However we're going to use this to adhere the foil to.


4. Place the foil, shiny side up on top of the web covered fabric. Still work between baking paper to protect the iron and quickly press to glue to the web. Be careful not to iron for very long as you will change the foils texture and lessen its iridescence.


5. When cool peel off the shiny cellophane top layer from the foil. The foil itself should have stuck firmly to the web. If it hasn't you may need a little more heat from the iron.


6. Trace the design you wish to cut from your newly foiled cloth onto it's back. I used a water soluble marker in case it showed through on the edges, but a light line with a grey lead should work fine too.


7. Ta Dah! One moon. I attached mine to the quilt with Vliesofix before stitching. I kept heat on for longer then i should have when ironing this directly to the foil and you can see the change in texture. Since the irridescence is still intact and I was aiming to add texture with stitching anyway I decided it actually worked well for what I wanted. You can see how it differs from the original foiling as I have placed a piece of that to the left of the moon.  I've used a holographic silver thread for the freemotion quilting.

You can also foil by layering it on top of bonding powder for a glittery effect or rubbing it over dry glue like Jones Tones Plexi glue for a 3D raised effect. Share

Wednesday, February 17, 2010

silks from India

Have finally gotten around to trimming off the corners then washing and folding lots of silk that my wonderful mother brought back from a recent trip to India and gave me for Christmas.

Since I have so many variations of similar colours I thought making a pieced quilt out of small hand cut strips and squares starting from one colour and going out from dark to light before merging to another colour might work well. The silks are quite fine so will probably need a little starch if not some sort of stabiliser before piecing. I don't really want to back them with anything else as it seems to take some of the point of making a silk quilt away.

Would love to hear other ideas people have for these fabrics. They certainly aren't ones I can just go out and buy again so there's a certain amount of trepidation when it comes to cutting into them. All pieces vary between about 25cm and 75cm in width.

Still have to wash the blues and greens. I wouldn't have thought it would take so long to do all the trimming and folding. Have lots of frayed threads from the edges I will try on the needle felting machine too!

Monday, February 15, 2010

February Friday Night Sew-in and Giveaway!

After a couple of weeks of really lack lustre motivation I saw the blog linked above (click on the heading) re an online organised Friday night sew in. The idea is that you list yourself as joining in, working on something crafty Friday evening and then on the Saturday post about what you worked on with a photo.

Sounds like a timely motivator for myself! Tonight I did manage to clean up the sewing studio a little with the idea being I will get in there tomorrow and work on some UFO's. (unfinished objects) :)

If you want to join the sew in click on the link above to visit the organisers blog!

My spell checker is telling me I can't spell lustre or organiser because i've used the Australian English spelling. Makes me wonder what other UK / aussies etc do when they blog. If you're not someone who lives in a US english country - what spelling do you use when blogging on the world wide web?