Soldering irons (wood burning tools and stencil cutters too!) make a wonderful way to cut synthetic fabrics. They seal the edges at the same time, giving a laser cut edge look, plus you can also use them to secure one layer on top of another by melting them together. Make this amazingly beautiful butterfly in only about 30 minutes and learn some techniques to inspire your next textile art piece.

You Will Need:
1. A template - you can download the Ulyssees butterfly one I designed below for personal use.

2. A soldering iron, wood burning tool or stencil cutter.
3. A smooth topped glass chopping board (or a pane of glass with tape over the edges to make it safer to handle).
4. Three pieces of black organza slightly bigger than the butterfly template.
5. Textiva (Fantasy film), I ironed 3 sheets of an iridescent blue together for the butterfly pictured. You can buy Textiva online, however you could also used Angelina fibre ironed into sheets or any pretty, sparkly synthetic fabric.
6. A well ventilated area. I also advise you to wear a mask suited for vapours, I use reasonably cheap disposable ones from the hardware store with a vapour filter built in as they are so light.
7. A tool for holding down small pieces (a little screw driver or similar is fine - just make sure the handle end won't heat up.
Watch the video tute I've made below (I filmed it on the spur of the moment so forgive me for the soft focus and making it up as I go along!) for full details, however I've also written the steps below.
Directions:
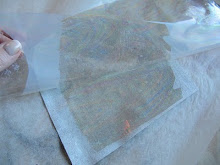
• On a heat proof surface place the print out of the butterfly template above. Cover this with your piece of glass so you can see the template through it.
• Iron 3 pieces of black organza a little bigger than the butterfly template so they are nice and flat. Position all three of these on top of each other over the template. You should still be able to see the outline to trace around.
• With your soldering iron draw a line around the edge of the organza, not pressing hard enough to cut. This adheres it softly to the pane of glass, making the rest of your work easier. This step is easiest is the fabric is flat against the glass and you use a metal ruler or similar as a guide, pressing it down on the fabric as you go.
• Carefully trace around the outline of the butterfly with the soldering iron. Go slow enough to cut through all 3 layers of the organza.
• Gently remove the organza from around the outside of the butterfly, leaving the butterfly shape on the glass chopping board if possible.
• Flip the glass plate so that you have a clear area to trace the blue parts from the textile and position a blank piece of the glass over this part of the template. Carefully cut around the Textiva. Don't push out the little pieces yet as it helps to know where they go if you leave them in.
• After you have cut all the blue pieces replace the chopping board so the black organza butterfly sits inside it's outline. Carefully place the first blue piece on top in the correct position and gently draw around the edge of it with the soldering iron to melt it into the black backing layer. I often hold one edge down with a metal tool and 'tap' with the soldering iron until it has bonded enough for me to trace over the edge without it moving.

• Finish attaching the rest of the blue pieces and carefully peel your butterfly from the chopping board.
Admire your handiwork :)
The video:
 |
| The first butterfly I made using this process. This one also has score lines drawn into the wings by using the soldering iron very lightly on the black organza to 'draw' in marks. |